Saturday, June 18, 2016

Little Lizard King: Harbor Dress-Sew Patriotic!


We got back from our trip to New Mexico earlier this week and can I just say that I just really missed my sewing machine! I was excited to get working on some projects I had been obsessing over the entire 820 mile drive home. I have been crushing on the Harbor pattern by Little Lizard King for a while. I just love the military style details in this pattern. It was perfect for creating a fun patriotic dress for the Fourth of July! The full gathered skirt kept it sweet and feminine and the peplum gave it a bit of a vintage feel. It reminds me something Agent Carter might wear.


If you haven't noticed already, I kind of like anything antique or vintage. I have a modest collection of vintage Pyrex and other housewares that makes me almost as happy as sewing does. I like to think about the history of an item. While they are just "things" I know that they were a part of someone's everyday life. I enjoy imagining what that life was like. I get really excited about creating thing that have story behind them too and this dress has a little "story" in it.  While I was brainstorming about what comes to mind when I think of the Fourth of July, of course, Stars and Stripes, Red White and Blue, Sparklers, Watermelon, and Fireworks all popped into my head. Then, I thought about our military. My Grandfather, Uncle, and Brother have all served in the military and worn a uniform. They are just a few of the many that have worn a uniform for us, for our country. While we were on our trip, my brother let me have one of his old uniforms and I knew it would be perfect to use for this dress. I used the entire length of a pant leg for the bow on the back!

I hope this gives you some inspiration to sew-up your own patriotic dress for the Fourth. You can get Little Lizard King's Harbor pattern HERE.


Thursday, June 9, 2016

Made for Mermaids: Daphne at Red Oak II


My little brother went into the Air Force straight out of high school. For the past 11 years I've only seen him intermittently in between deployments. He has never lived somewhere within driving distance, so when he moved somewhere that was only 12 hours (more like 15 if you are traveling with kids) we were all thrilled! When he met a nice girl and asked her to marry him, we were even more thrilled, not just for his happiness, but because we know that means he will be around more! Ha ha! This week we all made trip halfway across the country to be here for his wedding. I obviously spent sometime thinking about and planning my family's outfits for the wedding. I still hadn't decided on what pattern I'd use for Pretty Mama's dress when I was asked to test Made for Mermaids' newest pattern, "Daphne". Sometimes, the stars just align and the perfect pattern presents itself and Daphne sure was the perfect pattern. I planned everyone else's outfits to coordinate with it. I will post some family pics from the wedding soon. Before we left, I had to get my tester photos done and I thought of the perfect location.


I had heard about Red Oak II and seen many photos taken there over the years and I had been dreaming of doing our own shoot there for a while. I mentioned it to my husband and he thought it sounded like fun. We packed up all the kids and headed out. Lowell Davis relocated many old buildings from his childhood hometown of Red Oak to his farm to create Red Oak II. This sort of Made Ghost town is like a giant piece of art filled with Davis' sculptures and chippy vintage goodness. It was an absolute dream to shoot there. My husband and I often take turns with the camera, so there is a good mixture of shots taken by both of us here.
This post is less of a pattern review and more about showcasing it's beauty! Made for Mermaids Daphne comes with options for top, dress, and Maxi length, It can be made with a full off the shoulder ruffle or off the shoulder flutters and can be made with or without tie straps. I made dress length with the flutters without straps.  I added a little scalloped lace to the flutters and I love how it looks, although it did change the way the flutters fell a bit. It was a super fast sew and it fit my daughter pretty perfectly.  She loves her dress and had to run and show daddy right away as soon as she tried it on.  We love it! Daphne and Mama Daphne release tomorrow! Make sure you pick them up. 
Anyway, We took lots of pictures! Enjoy!

Tuesday, May 17, 2016

Paraplu: Bartowski Slim Tie Pattern

Last week I had the pleasure of testing the Bartowski Slim Tie Pattern by Paraplu! This pattern's name references the main character from the show "Chuck" and his affinity for this style tie. In fact this pattern would be perfect if you wanted to create a "Nerd Herd" Costume for your little guy or gal. I found a Nerd Herd badge template here that would just be the perfect addition.

My oldest boy will be "graduating" Pre-school this evening and just like any event, I had to sew something up for him to wear. I had been lost in my sewing La La Land trying to figure out what I'd like to make when I saw the tester call pop-up for this tie. DING DING DING! This would be so cute on my little graduate. 

It was just a quick one day test and I used my youngest's nap time to get it done. The sizes range from 1-12 years with options of 34,38,42,46, and 50 inch ties. We were assigned the 42" tie. The pattern was well written and full of drawings throughout which I always find very helpful. I really like the clickable table of contents that allows you to easily jump to the part of the pattern you need. It also has the "layers" feature that gives you the luxury of only printing the size you need. Yay, Layers! I also really liked that the drawings were color coded with a key on every page. It was nice not having to scroll back and forth trying to figure out  what I was looking at. I liked how there were quirky little jokes in the tutorial, I mean, I sew for the fun of it and this was definitely fun! Bonus, I was able to make this in under and hour from printing to last stitch and I'd say I'm a bit of a slow sewist! Yes! 

I used some fabric I had in my stash. I knew I couldn't fail with this print for my airplane loving boy! I thought it fit a little with the graduation theme. Something cheesy like, "Soaring to new heights"came to mind. I used a solid red for the contrast section of the tie. As soon as the soon to be Kindergartner got home, I quickly searched "How to tie a Windsor Knot" on YouTube and I found this gem. (A-hem, you're welcome) We headed out for some pics and he totally melted his mama's heart with that sweet smile.


I can't wait to see him sing the songs he's been practicing as I turn into a blubbering mess. I will be able to say, "Hey, I made that! Oh and I made the tie too!" 

Go get your copy of The Barowski Slim Tie in the Paraplu Esty shop and why not pick-up it's counterpart The Halpert while you're at it? There is a special discount code on The Mae & K blog I can't wait to see more patterns from Paraplu! It's safe to say that I'm officially a fan!

Wednesday, April 27, 2016

May the 4th and What NOT to do when working with Iron-on Vinyl

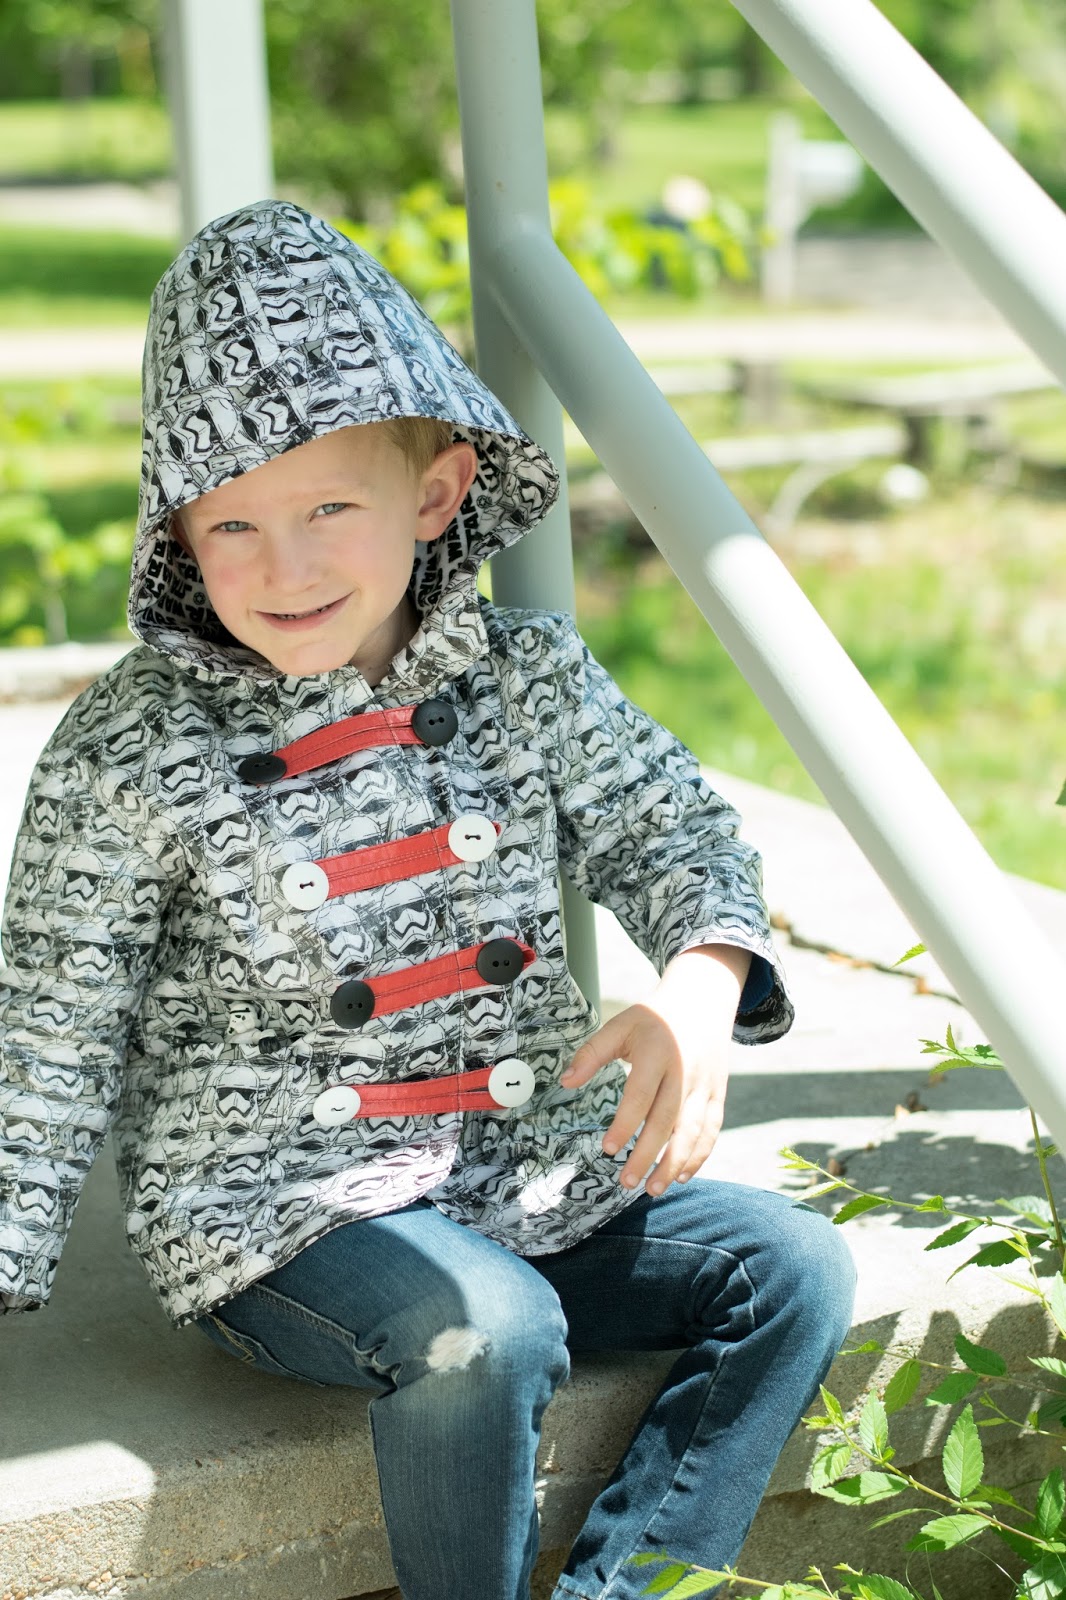
    This week I was lucky to get a chance to test The Amsterdam All Weather Coat by Mummykins and Me. I have tested for this designer before and it sort of rocked my world. The Berry Bubble Shorts. I had never made something so tailored. I always tell my husband these are NICE shorts as I put them on my messy 3 year old, fingers crossed hoping she wont ruin them somehow. I said the same thing about this coat. This is a NICE coat! This is the first pattern I've tested with my oldest boy. He was so excited for me to make something special for him. He's such a good kid. He's always so grateful for everything he gets. When it was time to shop for fabric, I had a something more classic in mind, but when my son and I saw the Star Wars fabric we knew it would be the way to go. I always have such grand plans for my projects. I daydream ( or "obsess" as my husband likes to say) about epic photoshoots and fabric combinations. I feel like I'm in The Secret Life of Walter Mitty . Anyway, the fabric was just a regular cotton woven from Walmart and because I signed up to make the raincoat version for this test, I had to use iron on vinyl to make it waterproof. *Insert Walter Mitty style dream sequence of me laminating that fabric like a boss*
 Nope. Nope. Nope.

 Here's what NOT to do when working with iron-on vinyl:

 * Do not look at the fabric requirement chart and think, "I'll just need a couple of yards". Nope. Remember that the bolt of vinyl is not as wide as a standard bolt of fabric. My sweet hubby went back to the store for me.

 * Do not accidentally ball up the end of the piece of vinyl that you are trying to apply. Go slowly and be careful to keep it lined up. It will become hopelessly stuck together even worse than plastic wrap.

 * Do not let your hands go all willy nilly with that iron and melt your vinyl.

 At this point it was kind of a Murphy's Law situation mixed with my own lovely anxiety induced habit of self sabotage. It really should not have been this bad. I should have been more thoughtful, but when you are trying to get a million and one tasks done while the 10 month old is napping, you tend to rush things. Lets not go too far down the road of self loathing.

 How about some Dos?

 * Do save the paper that the vinyl was on, to use while pressing. This will save you from melting it.

 *Do use a heavy duty needle when sewing vinyl.

 *Do bake your husband a batch of cookies for going out for more vinyl.


 So back to the pattern. It was such a great sew! It is fully lined with no exposed seams. No serger needed for this project. I lined it with coordinating Star Wars flannel. The fit on my guy was on point. When he first saw it, he said, "Aww I love it Mama!" and gave me hugs. which definitely made all of the issues with the vinyl worth it. Mummykins and Me patterns give me a little challenge and I love that. I feel like I have learned something new when I complete a pattern. I highly recommend trying one of her patterns if you haven't already. The Amsterdam All Weather Coat can be made for winter with warmer fabric or lighter for spring. It is available in women's sizes as well. Perfect for coordinating with your own little guy. They offer a bundle of both patterns too! This has been the year of Star Wars for my biggest guy. Everything is "Dark Vader" (he's four, I might correct him someday) and Storm Troopers. His coat will be treasured for sure and he will have something super cool to wear to school next week for "May the 4th". It's okay we can treat it like a holiday, they're only little for a while.

Sunday, April 24, 2016

Everyone has to start somewhere...

Like many other ladies that love to sew, I have fond memories of long afternoons spent sewing with my Grandma. She's been gone for years, but I can still picture her long fingers gently guiding fabric through the machine. I remember playing with the pins on her orange pincushion and pricking my fingers. I can still smell the coffee and see the Blue Jays that she would point out to me on the feeder just outside the kitchen window. Sewing is like comfort food. I start sewing and as soon as I hear that whir, I'm taken back to my childhood, a place where I felt safe and loved. It's the same feeling I get when I eat my Mom's Swedish Meatballs. I feel warm and calm and completely at ease. I didn't really sew much other than that until my sweet husband bought me a sewing machine for Christmas 4 years ago when I was pregnant with my daughter. I started sewing up every free tutorial I could find. I made little gifts for all of my friends and family. I made a tiny newborn dress for my daughter with a paper pattern and that's when I first started getting interested in sewing clothes. After she was born, I had my hands full with two little one's 15 months apart and I didn't have as much time to sew. I found Matilda Jane Clothing through Instagram and Well Dressed Wolf soon after that. I was just building up a nice closet for Lilly when my husband lost his job. I couldn't justify shopping like that anymore. I started sewing again. Then, two years ago I bought my first PDF pattern. It was Made for Mermaids "Molly". I printed out that pattern and worked on it for days. When I was done, I was so proud of what I had accomplished and it was much needed therapy for a pretty tough time in my life. That was it, Made for Mermaids was like my gateway drug into the addiction that pdf patterns can be. Ha ha! I have pretty much sewn daily since then. My daughter has a beautiful mama made wardrobe and we have a lot of fun with picking out fabric and having our little photo shoots. Even though my Grandma and Lilly never met, I feel like they are connected through our love for sewing. I love making these memories with her and I hope that she looks back on them just as fondly as I look back at my own.
Lately, Lilly and I have been having a lot of fun testing sewing patterns. When I saw the post for the Made For Mermaids Top Tester Challenge I knew we had to be a part of it. I gave it my all! I chose the Lauren Tunic and the Evie Shorts. I really enjoy making pleats and pintucks, so naturally these were my first choice. Lauren can be made in Top or Tunic length and has multiple sleeve options. It can also be made without the collar. I made it sleeveless, tunic length with the collar. I just love Peter Pan collars and I will be sad to see the day when they're no longer in style. I wanted to make tunic length to show two styling options. We paired it with jeans and wore it untucked for one look. We tucked it into the Evie shorts for the other look. I made them out of denim and added some big wooden buttons to the waistband. These can be made as pants as well, but we had to make the shorts because the weather is getting NICE around here! I love all of the options that are available in these patterns. They can really be used year round!
Hope you have enjoyed my VERY FIRST blog post. I'd love it if you'd read more about Me and My family and sewing in the future.